

- Contents
My web page
Entering the Data for a Purchase Loan
For ease of reference, we will generally use the term “DU” to refer to Desktop Originator® and Desktop Underwriter® (DO®/DU®).
This document shows you how to create a new purchase loan casefile in DU and explains how to enter the minimum amount of data necessary to receive an underwriting recommendation for a purchase loan.
-
The Loan List is the first screen you see when you log in to DU. You can use the Loan List to create or import a loan casefile or to view a list of existing loan casefiles. To create a new loan casefile, click the Create Loan button.
Note: If your user ID allows access to multiple institutions (branch locations), a screen appears to allow you to select the institution under which you want to create the loan.

-
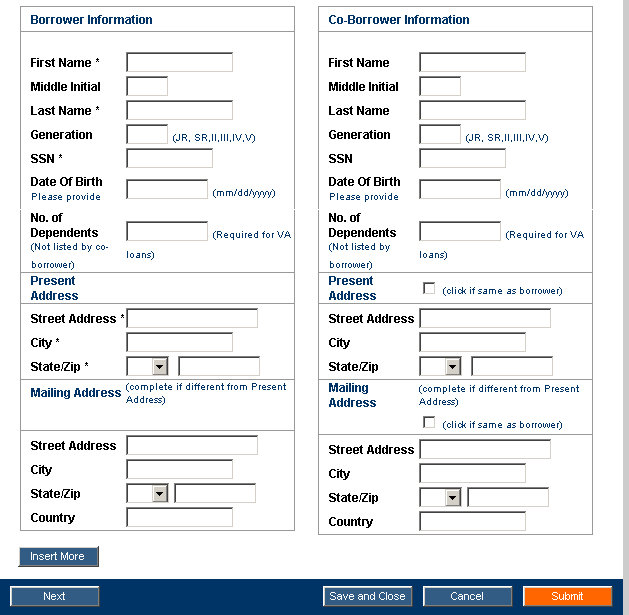
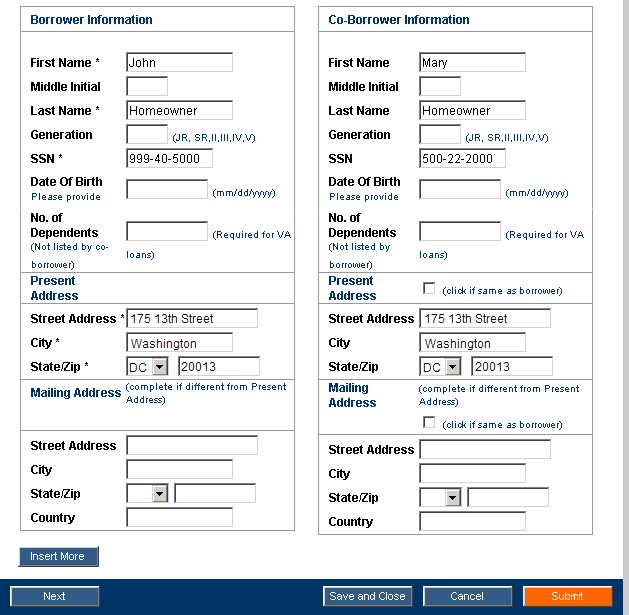
A new Quick 1003 opens. The Quick 1003 is an electronic version of the Uniform Residential Loan Application (Fannie Mae Form 1003).
The first screen in the Quick 1003 allows you to enter the applicant’s name and Social Security number under Borrower Information. Enter the same information for the co-applicant, if any, under Co-Borrower Information.
Note: If there is a non-occupant applicant on a primary residence transaction, then the occupying applicant(s) and non-occupant co-applicant(s) must be on separate loan applications. To add a separate loan application, click Insert More.
Tip: Fields required for a DU underwriting
recommendation are marked with asterisks(*).
-
Scroll down on the Borrower Information screen to enter present and mailing addresses. If the applicant or co-applicant uses a different mailing address than the present address, enter this information in the Mailing Address section.
Tip: If the applicant and co-applicant share the same present address or mailing address, you can quickly copy the address to the co-applicant’s side of the screen by clicking the Present Address or Mailing Address check box on the co-applicant’s side of the screen.
Note: If there are additional applicants on the loan, you must create a separate loan application within the loan casefile. To add a separate loan application to the loan casefile, click Insert More. In order to pull a joint credit report for two applicants, both applicants would need to be on the same loan application in DU. DU supports a maximum of four applicants. If there are more than four applicants, then you can manually underwrite.
Tip: Once
you have completed the required fields of the Borrower Information screen,
you have sufficient information to save the loan casefile at any point
within the loan casefile creation process, by clicking Save
and Close. You can re-open the file to continue adding data by clicking
Edit
Loan in the Loan Information menu.
-
To continue entering data, you can click Next to continue to the next screen in the Quick 1003, or you can click one of the links in the navigation bar on the left side of the Quick 1003.
Note: At this point, you have sufficient applicant information to order or reissue credit reports. For details, see Ordering a new credit report or Reissuing a credit report.
Tip:
Once you finish entering the Borrower Information, you can move freely
to any other section.

-
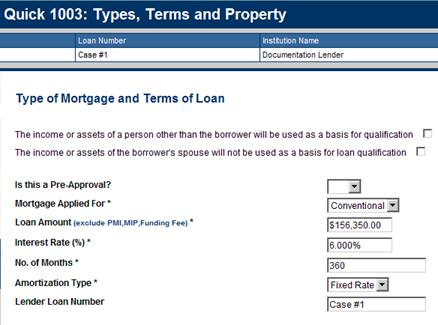
The next screen in the Quick 1003 allows you to enter data for the Type of Mortgage and Terms of Loan, and for the Subject Property Address and Purpose of Loan. At the top of this screen, enter the necessary mortgage data.
-
Scroll down to the Subject Property Address and Purpose of Loan section and enter the necessary data. Because this is a purchase transaction, select Purchase in the Purpose of Loan field.
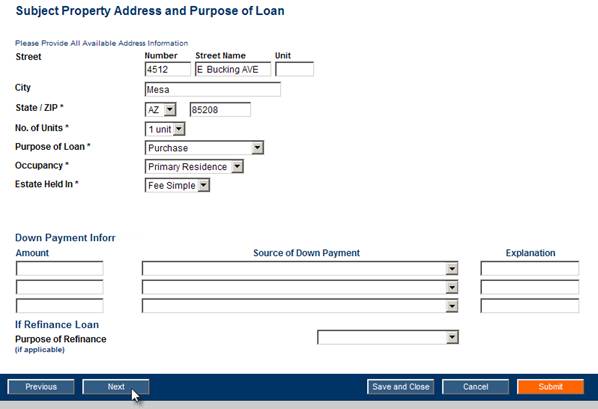
Note:
For guidelines on entering data in the Number,
Street Name, and Unit
fields, see Guidelines
for entering the subject property address.
To continue to the next screen in the Quick 1003, click Next.
-
The Employment Information screen appears. Enter the name of each applicant’s current employer and the number of years and months each applicant has been on the current job. For each job you enter, you must select Yes or No in the Self Emp field to indicate whether the applicant is self-employed on that job.
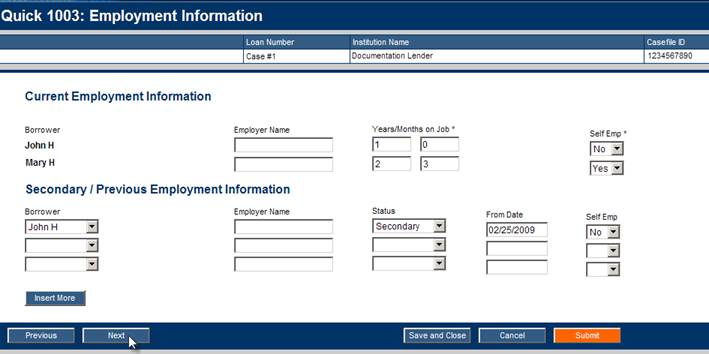
Note: Do not use the Employment Information screen to enter data for a homemaker, full-time student, or retired applicant. Only active employment information should be entered in this screen. If you enter any data in the Employer Name field, you will receive a Findings message that asks you to verify the employment. Any income that does not come directly from employment should be entered in the Other Income section of the Monthly Income and Combined Housing Expense Information screen.
If an applicant is currently working
at a second job, enter the data for that job in a separate row under Secondary/Previous
Employment Information, and select Secondary
in the Status field. You must also enter the From
Date
and select Yes or No in the
Self
Emp
field. Income from the second
job should be included on the Income screen and can be combined with the
income from the primary job if applicable.
Tip:
In some cases, you may also
need to enter information about an applicant’s previous employment. To
enter data for a previous job, use a separate row under Secondary/Previous
Employment Information, and select Previous
in the Status
field.
To continue, click Next.
-
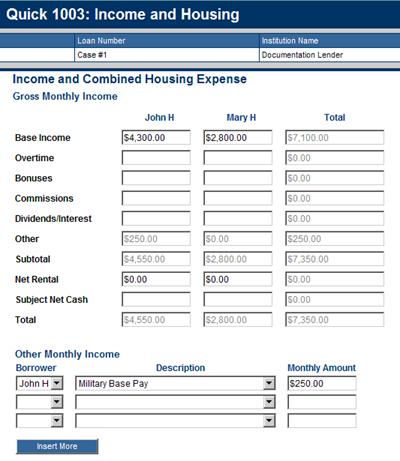
The next section in the Quick 1003 allows you to enter data about the applicant’s income and current and proposed housing expenses.
Enter the necessary data about the applicant’s monthly income at the top of the screen. For detailed information on how DU processes the income data you enter, refer to the Fannie Mae Selling Guide. Here are a few data entry tips:
-
-
The Base Income field should include income from the applicant’s primary job, along with any income that the applicant receives from second jobs that you entered in the Employment screen.
-
The Other field shows the rolled-up total of the amounts entered in the Other Monthly Income section of the screen. To place an amount in the Other field, you’ll first need to scroll down to Other Monthly Income section and enter the data there.
-
If the applicant has one or more rental properties, the rental income may be entered in the Income screen or the Real Estate Owned screen. For guidance on how to enter rental income data see Data Entry Instructions for Real Estate Owned and Liability Indicators.
The net rental income amount should reflect the total income or loss from all rental properties owned by the applicant, excluding the subject property. To show negative amounts, enter a minus sign (-).
-
-
Note: Additional guidance on calculating and entering net rental income and subject net cash flow can be found in the Fannie Mae Selling Guide.
-
Important: If the applicant is required to make alimony payments for more than ten months and you want to treat the obligation as a reduction to income, select the Alimony/Child Support other income type and enter the amount of the alimony obligation payment as a negative amount. When the borrower also receives alimony or child support income, combine the amount of the alimony or child support income and the alimony obligation payment and enter the net amount.
-
Scroll down to the Combined Monthly Housing Expense section and enter the necessary data about the applicant's current housing expenses. You must also enter the necessary data about the proposed housing expenses associated to the subject property. DU calculates the totals for you.
Note: On a primary residence transaction, the present housing expenses associated to a non-occupant applicant must be entered here, on the Liabilities screen and potentially the Real Estate Owned section. You may follow the same data entry guidance for Entering the Present Housing Expenses for Second Home and Investment Transactions.
To
continue to the next screen, click Next
.
-
In the Assets screen, enter the applicant’s asset information. For detailed information on how DU processes the asset data you enter, refer to the Fannie Mae Selling Guide.
To continue to the next screen, click Next.
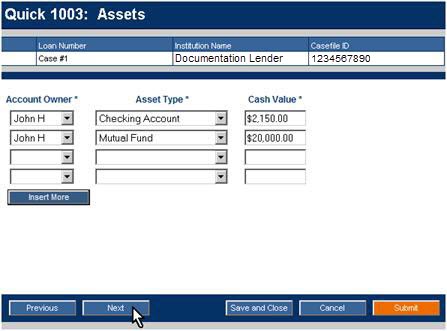
Note: A grant should be entered as a gift. Refer to the Fannie Mae Selling Guide for additional guidance on entering grants and gifts.
-
The quickest way to use the Liabilities screen is to let DU copy the liabilities for you from the credit report. To do this, you will use the auto-populate liabilities feature in the credit ordering screen. For details, see Ordering a new credit report or Reissuing a credit report.
To add more liabilities, click Insert More.

Note: For detailed information on how DU processes the credit-related information in the loan, refer to the Fannie Mae Selling Guide.
-
Using the indicators, you will need to select which account will be paid by closing, as well as those mortgages that are associated with the subject property and/or a rental property:
-
Select Paid By Close for each account that will paid by closing.
-
Select Subject Property Lien for each mortgage associated with the subject property.
-
Select Rental Property Lien for each mortgage associated with a rental property.
The Rental Property Lien indicator should not be selected for mortgages associated with a current residence that is also a rental property.
Important: If the transaction is a purchase of a second home or investment property, then the present housing expense payments you entered on the Income and Housing screen must be accurately accounted for on the Liabilities screen and potentially the Real Estate Owned screen if the loan casefile was created on or after June 1, 2020. This also applies to the current housing expenses associated to a non-occupant applicant on a primary residence transaction. For further details, refer to Entering housing expenses for second homes and investment properties.
You can also add liabilities in this section. To add rows, click Insert More.

Note: If you are completing the Real Estate Owned screen, you must match the mortgage liabilities to a record in that screen. For guidance on how to enter REO data see Data Entry Instructions for Real Estate Owned and Liability Indicators.
-
-
If the applicant is required to make child support payments for more than ten months, you must enter the monthly payment amount in the Additional Expenses section at the bottom of the Liabilities screen. If the applicant is required to make alimony or separate maintenance payments for more than ten months, you may:
-
Enter the monthly payment amount in the Additional Expenses section at the bottom of the Liabilities screen; or
-
Enter the amount of the alimony or separate maintenance payment as a negative amount in the Income screen under the Alimony/Child Support other income type.
Whenever
an alimony, child support or separate maintenance payment is entered in
DU, whether as a liability or a negative income amount, you must also
answer Yes to Question G in the Declarations screen for the appropriate
applicant.

Note:
If you enter a monthly payment
amount but you don’t enter a number in the Months Left to Pay field, the
payment will always be included in DU’s debt-to-income ratio calculation.
To continue to the next screen,
click Next.
-
Enter the necessary data in the Details of Transaction screen. To continue to the next screen, click Next.
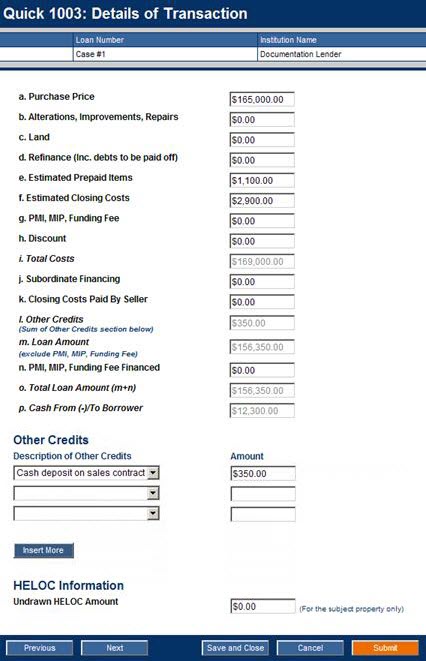
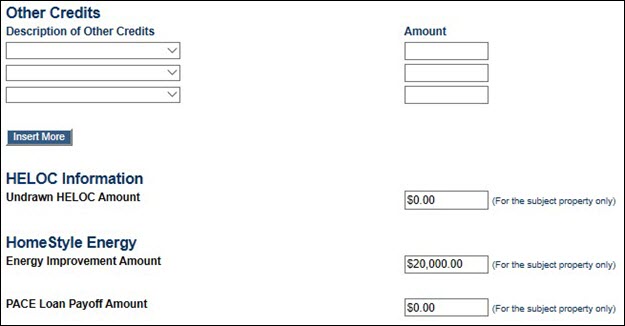
Note: If you enter an amount on line b, the loan casefile will be underwritten through DU as a HomeStyle Renovation Mortgage. Refer to the Fannie Mae Selling Guide for more details on the HomeStyle Renovation Mortgage product.
Data Entry Tip: If there is an energy improvement loan, then the balance should be entered in the Energy Improvement Amount field. If there is a PACE loan, then the balance should be entered in the PACE Loan Payoff Amount field. DU will add the amount entered in these fields to the purchase price (line a).
Important: If there are interested party contributions (IPCs) and they exceed the limits specified in the Selling Guide, then they are considered sales concessions. You must adjust the property's sale price downward to reflect the amount of contribution that exceeds the limit. The following is an example of how this must be reflected in DU.
Purchase price: $300,000
LTV = 94% (IPC limit is 3%)
Seller paid closing costs: $15,000
Sales concessions: $6,000 ($15,000-9%,000 IPC limit)
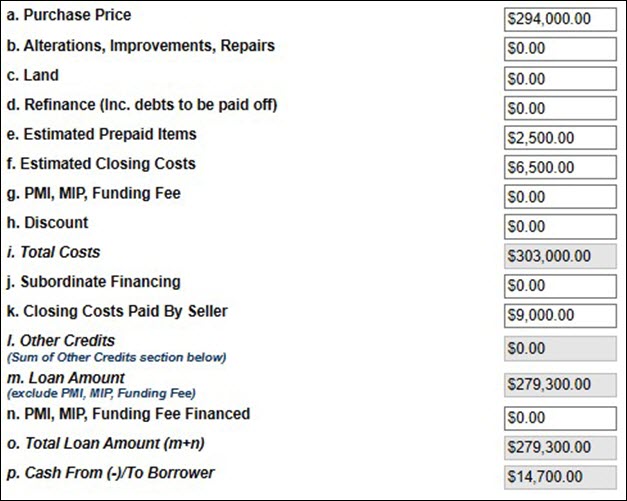
Note: Line a was adjusted downward by the amount of the sales concession, and line k was adjusted downward by the same amount in order for line p to calculate correctly.
-
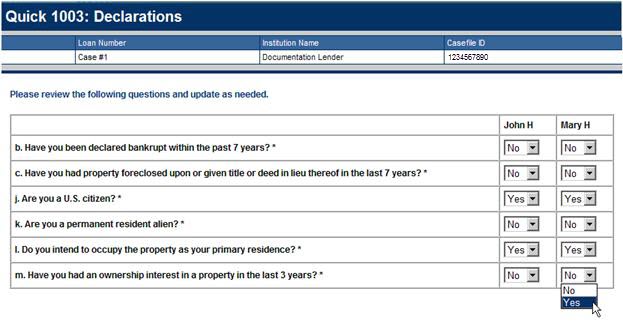
By default, most of the answers to the questions at the top of the Declarations screen are already selected. You need to make sure that these questions are answered accurately. Before you submit the loan casefile for an underwriting recommendation, you must also provide the applicant’s answer to the question “Do you intend to occupy the property as your primary residence?” and "Have you had an ownership interest in a property in the last 3 years?"
-
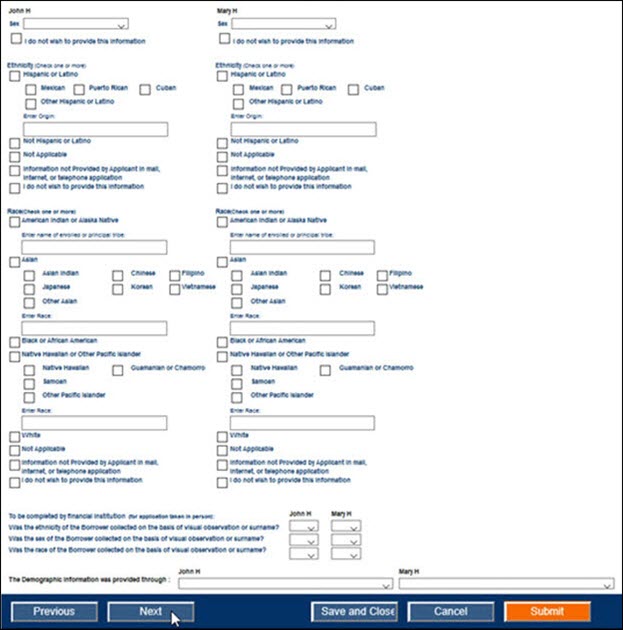
Scroll down to the Demographic Information section and enter the necessary data. When appropriate, you can select multiple race categories for each individual applicant.
Note:
For applications taken by telephone,
you must ask for this information, but you cannot require the applicant
to provide it. You should inform the applicant that the federal government
is requesting this information in order to monitor compliance with federal
statutes that prohibit lenders from discriminating against applicants
on these bases.
For applications taken in person,
you must ask for this information, but you cannot require the applicant
to provide it. If the applicant chooses not to provide the information,
to the extent possible, you should note the information on the basis of
visual observation or surname. You should also inform the applicant that
if the information is not provided, you are required to note the data
on the basis of visual observation or surname.
Although the information in this
section is not required to qualify an applicant (or co-applicant) or underwrite
a loan, this information is required in connection with the Federal Reserve
System’s Regulation C and the Home Mortgage Disclosure Act (HMDA) and
will be required at delivery to Fannie Mae.
To continue to the next screen, click Next.
-
Enter the necessary data in the Additional Data screen. To submit a loan casefile for an underwriting recommendation, you should enter the property appraised value, and you must enter the subject property type in this screen.
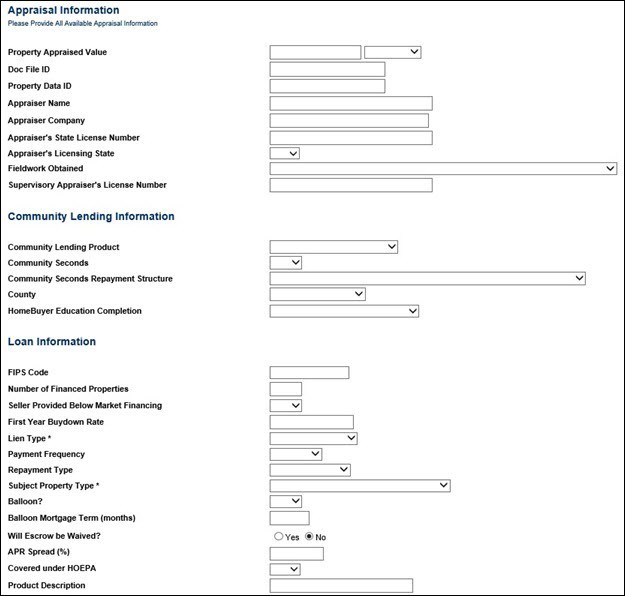
Note: The only time an attached or detached property should not be designated as "Attached" or "Detached" is when another property type applies that would affect the risk, eligibility and/or messaging. For example, the "Planned Unit Development (PUD)" property type affects messaging. Therefore, if an attached or detached property is in a PUD, then "Planned Unit Development (PUD)" should be selected in the Subject Property Type field.
Data Entry Tip: The Federal Information Processing Standards (FIPS) Code can be used to tell DU what area median income (AMI) limit to use on a Community Lending Product or what loan limit to use on a high-balance mortgage loan. If DU standardizes the address to an incorrect census tract or county, which causes DU to use an incorrect AMI or loan limit, you can enter the 11-digit FIPS Code associated to the correct census tract. DU will then use the corresponding AMI and loan limit. If you enter the FIPS Code, then you will be required to document the subject property is located in the specified census tract or county.
If you are submitting data for a conventional
loan casefile, you are now ready to submit the loan casefile for an underwriting
recommendation. If you have not requested or reissued a credit report,
you will also need to do so at this point.
Click
Submit. For details on the
credit or underwriting submission process, see one of the related job
aids listed below.
Validating Income, Assets and Employment Using the DU Validation Service
To validate income, assets and or employment using the DU validation service you must order the vendor report from an authorized DU validation service vendor before you may enter data in the Additional Data Screen.
The following guidance for ordering a vendor report applies to lenders who are ready to complete the onboarding process with a vendor of their choice:
- For The Work Number® or tax transcripts obtained from Equifax® (or a report distributor who obtains the information from Equifax®), you must complete and submit the DU Validation Service Set-Up Form (DU Validation Setup Form). Please note you will need to use your Fannie Mae DO/DU login credentials to view this document. The lender loan number is used by DU Validation service to pull the vendor report. Submit the setup form and allow up to 72 hours for activation. Start using the validation service by requesting verification reports. For additional details refer to the DU Validation Service Reference Guide.
- For all other vendor reports, no set up form is required. To begin using the DU validation service, complete contracts and activation with an authorized DU validation service vendor. Start using the validation service by requesting verification reports. DU has an Income & Asset Validation section in the Additional Data section of the online loan application. In this section, you choose the name of the authorized DU validation service vendor and enter the corresponding reference number associated with the report obtained from the vender.
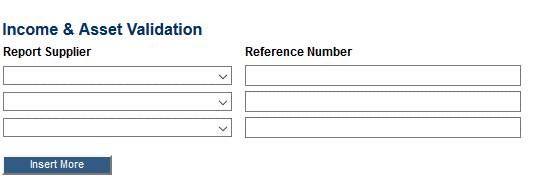
Up to four Reference Numbers may be entered for each DU validation service vender name selected. You can enter the vendor and reference number information for each borrower on the loan application.
You must enter the reference number in the following format: “SSN:Reference ID” [e.g., 999999999:100003]. The SSN should not include dashes and vendors may have different terms for the Reference ID, as outlined in the DU validation service reference guide.
Related Job Aids
© 2021 Fannie Mae. Trademarks of Fannie Mae.