My web
Committing Loans for Best Efforts
![]()
Introduction
This job aid details the steps needed to commit a best efforts loan once the loan information is already entered or imported into the Pricing & Execution-Whole Loan® (PE-Whole Loan) application. For detailed information on entering new best efforts, see the Entering a Best Efforts Loan Using a DU Casefile ID or Entering a Best Efforts Loan Using "Other" Underwriting Method; or Overview of Best Efforts job aid to understand navigating to the Commit Loans screen.
Once you click on the Commit Loans button from the Eligible Loans Pipeline, the Commit Loans screen opens.
Follow the steps to commit a loan(s) on a best efforts:
-
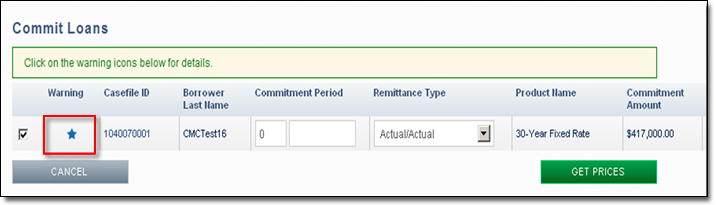
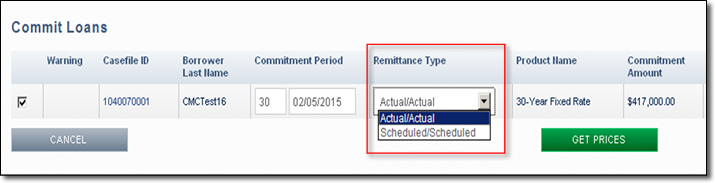
On the Commit Loans screen, the check boxes on the left-hand side of the screen indicate what loans are selected to commit. When presented with multiple loans you may continue to work with all of the loans or you may deselect a loan at any time prior to committing.

-
If applicable, review any error messages in red or warning messages represented by a yellow box. In some cases, you may be advised to click a Warning message icon
 for more details on either potential duplicate commitments or data mismatches between PE – Whole Loan and DU, when committing a Casefile ID underwritten in DU.
For more information on our best efforts duplicate commitment and worse-case pricing policies, see the FAQs | Best Efforts Program Basics document on fanniemae.com/singlefamily/pricing-execution-whole-loan.
-
If after reviewing a Warning message, you want to proceed with the commitment as is, click OK. If you want to make changes to the loan information prior to committing, click Modify.
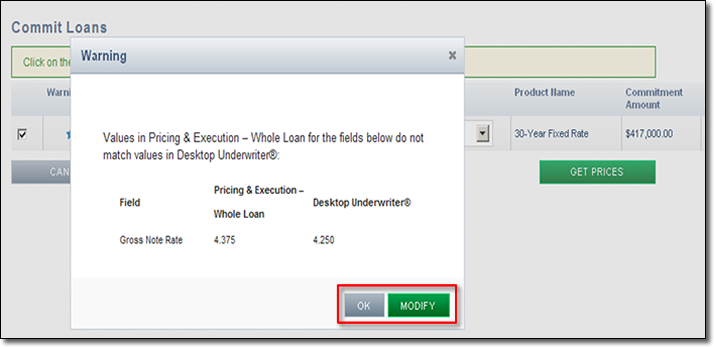
For more information on addressing the error messages and making changes to the loan information prior to committing, see either the Modifying an Eligible Loan for a Best Efforts Commitment job aid. -
The Commit Loans screen will display several fields that are not editable on this page including, Casefile ID, Borrower Last Name, Product Name, Commitment Amount, Gross Note Rate, and Execution Type.
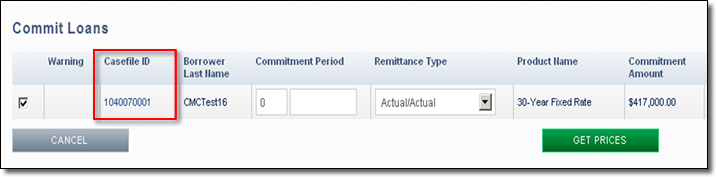
If you wish to edit any of the loan information prior to committing, click the Casefile ID hyperlink in the Casefile ID field. For more details, see Modifying an Eligible Loan for a Best Efforts Commitment job aid. -
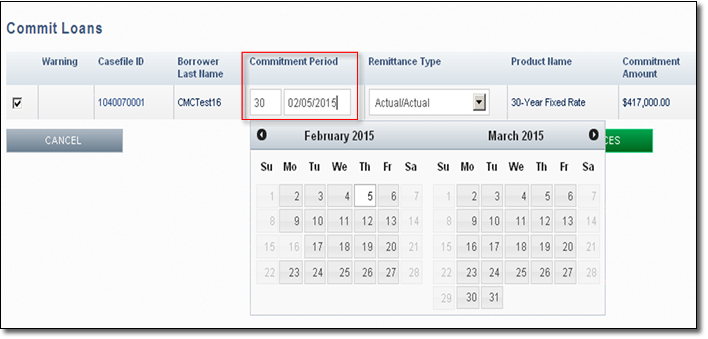
To select the Commitment Period and Commitment Expiration Date, either enter a specific number of days in the Commitment Period field, enter a date in the Commitment Expiration Date field or select a commitment expiration date from a calendar that appears after clicking in the Commitment Expiration Date field. The commitment expiration date must fall on a valid business day.
-
Select the desired remittance type from the Remittance Type drop-down list.
Your options may include:-
Actual/Actual: A method of sending mortgage payments that requires the seller to remit only the actual interest due (if it is collected from borrowers) and the actual principal payments that it collects from borrowers.
-
Scheduled/Scheduled: A method of sending mortgage payments that requires the seller to remit the scheduled interest due and the scheduled principal due whether or not payments are collected from borrowers. You must be approved for Scheduled/Scheduled remittance in order for this selection to be available.
-
-
Clicking the Cancel button returns to the previous screen.
-
Click Get Prices to proceed with committing the loan. The Sell Loans: Commitment Price screen opens.
.

-
From the Sell Loans: Commitment Price screen, review the commitment terms and Pass-Through Rate price.
-
If you agree to the commitment terms and price, click Accept to finalize the commitment.
Note: You have 60 seconds to accept the commitment. All prices are "live" from 8:15 a.m. to 5:00 p.m. ET and may move throughout the day based on current market conditions. You may commit loans as best efforts after business hours until 10:00 p.m. ET. (Prices may vary from intraday.) If the 60-second window expires or if you click Reject, the system will return you to the Commit Loans screen.

-
The Commitment Confirmation screen appears with information about the commitment. Click the Expand All | Collapse All links at the top of the page to view/hide all information. Click the arrow next to each section heading to expand or collapse individual sections.

-
The PE – Whole Loan application automatically generates an email confirmation of your transaction. An email confirmation will only be sent if an email address has been added to your contact information. For more information, see the Setting Up Your Contact Preferences job aid.
-
To export a Commitment Confirmation screen to a comma-delimited (.csv) file, click the Export icon
 at the upper right
of your screen.
at the upper right
of your screen. -
To print the Commitment Conformation screen, click the Print icon
 at the upper right of your screen.
 -
To make another commitment, click Make Another Commitment at the bottom of the screen.