My web
Making a Mandatory Commitment
![]()
Introduction
Through the Pricing & Execution – Whole Loan® (PE – Whole Loan) application, you can make a mandatory commitment through the Make Commitment button in the header or from the Browse Prices results screen. For more information, see the Navigating PE – Whole Loan Application job aid. See Browsing Prices - Mandatory job aid for detailed information on the Browsing Prices screen.
Making a Mandatory Commitment
Follow the steps to make a mandatory commitment:
-
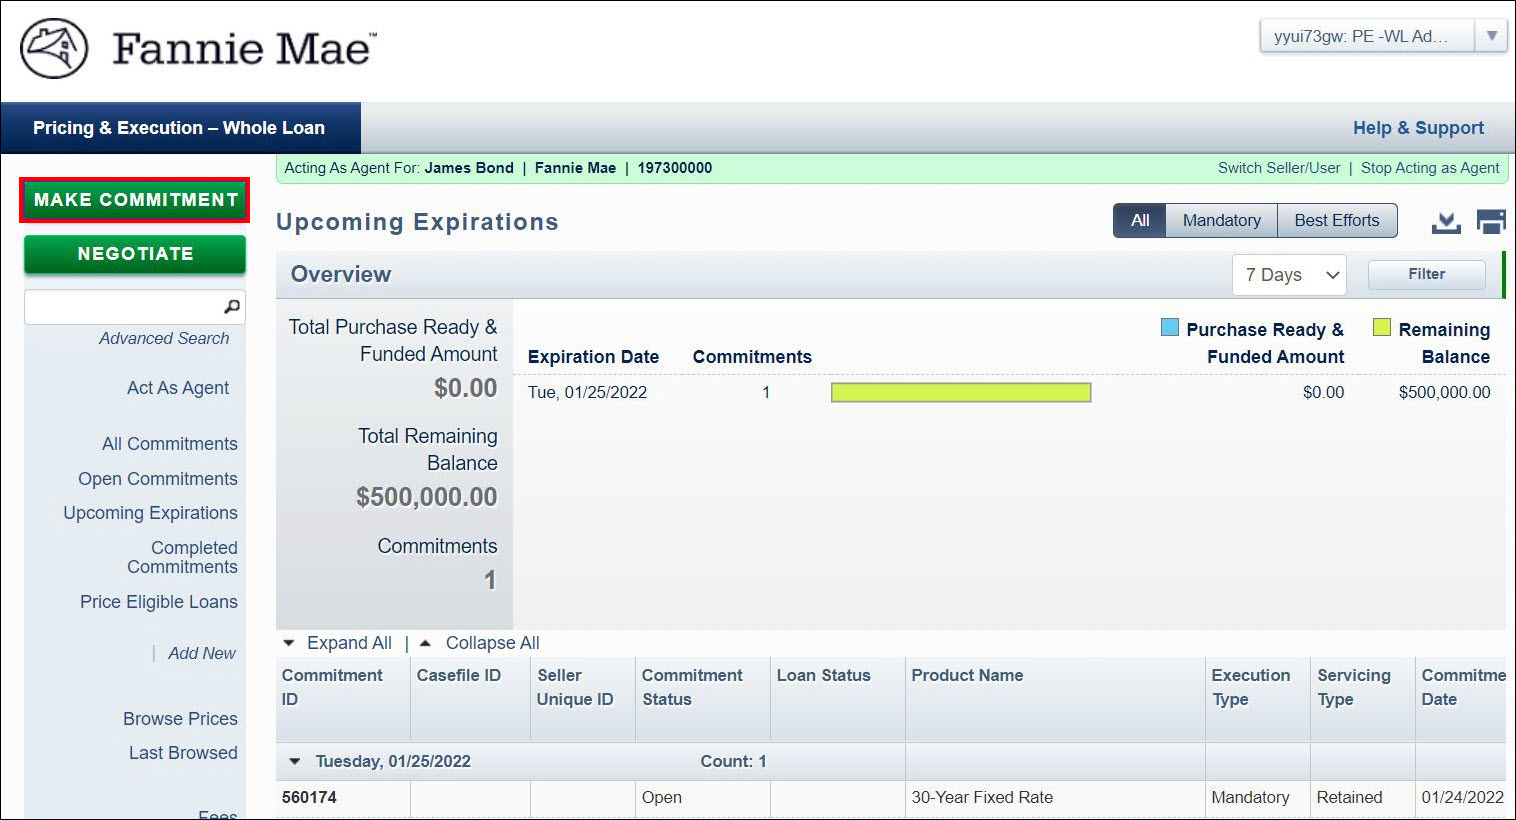
Click Make Commitment at the top of the function menu on the left. Alternatively, a commitment can be initiated from the Browse Prices screen by selecting the product, pass-through range, and delivery period you would like to commit. The Make Commitment flow from the Browse Prices results screen is outlined in the Browse Prices - Mandatory job aid. If committing from the Browse Prices screen, skip to Step 4.
-
Click the Mandatory toggle at the top right of the screen, and the Make Commitment screen appears.
-
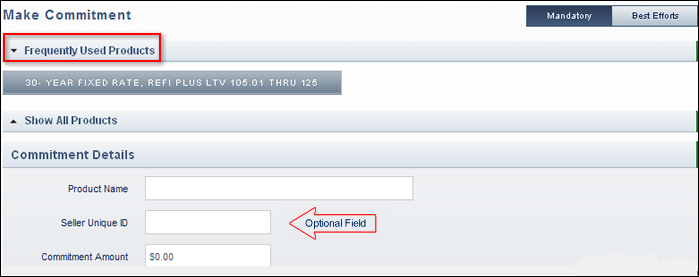
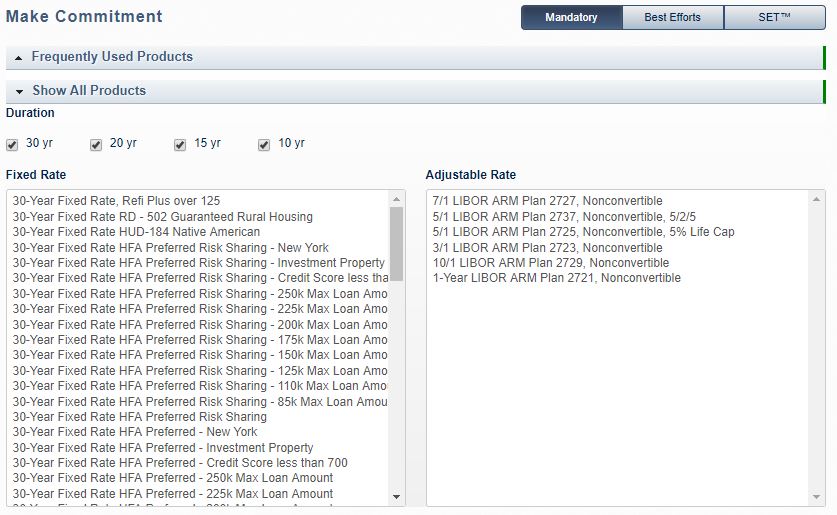
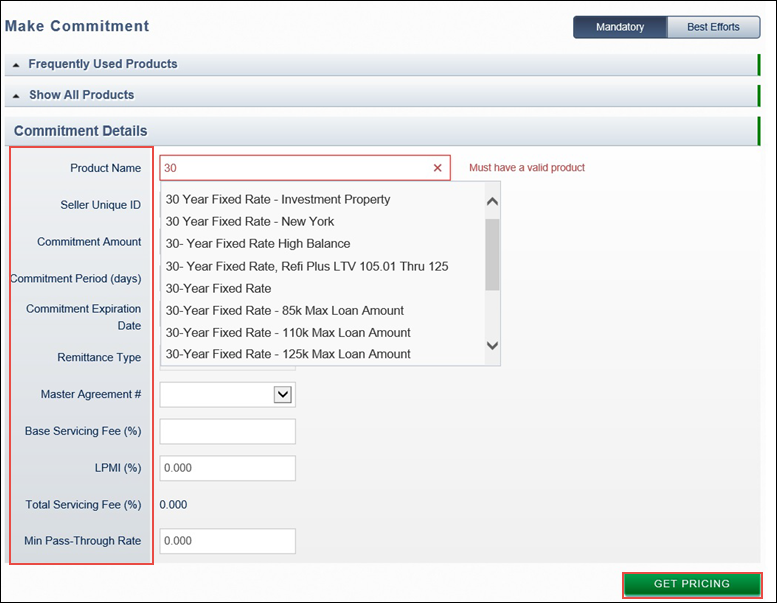
Specify the product to commit. There are three ways to do this.
-
Click Frequently Used Products and then click the button for the product to be committed. The Frequently Used Products section includes the four products that you commit the most. This feature will be enabled after you make your first commitment.
-
Click Show All Products and select the product name from the list that appears. You can narrow your choices by deselecting the check boxes next to the amortization terms you do not want to view.
-
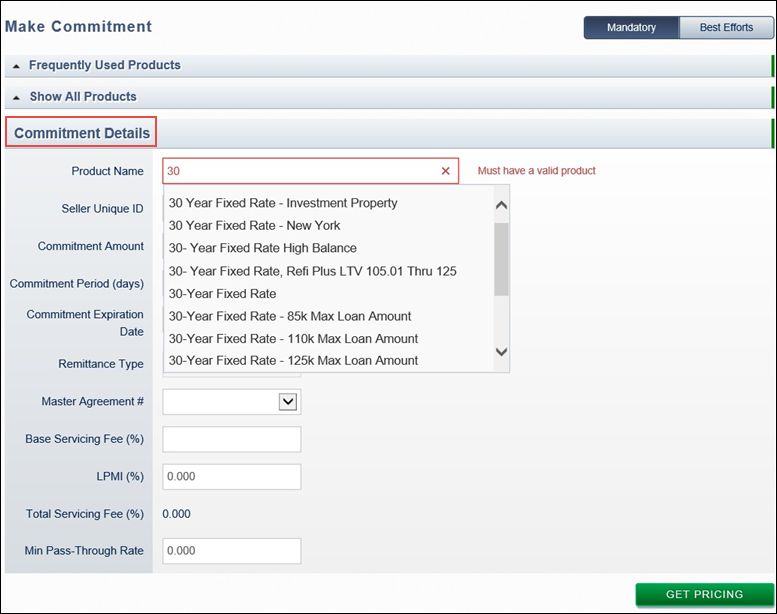
Enter the first few characters in the Product Name field, and make your selection from the list that appears.
-
-
Complete the remaining fields in the Commitment Details section as shown in the table.
Field Name Description/Instructions Seller Unique ID (not required)
A name your company uses to uniquely identify the commitment (e.g. lender loan number or borrower name).
Note: You cannot use special characters in this field.
Commitment Amount
Enter the amount you intend to commit.
The commitment amount represents the total dollar amount (unpaid principal balance) of the mortgage loans you plan to deliver under the commitment.
Commitment Period (days)
Position your cursor in either the Commitment Period (days) or Commitment Expiration Date fields. Select a commitment expiration date from the calendar. The commitment expiration date must be a Fannie Mae business day. Both fields are populated automatically after you select a date. Alternatively, you can manually enter the number of days in the Commitment Period field. The expiration date will then be automatically populated.
When selecting a commitment period, be sure that you can make good delivery of loans by the expiration date of the commitment. Be sure that you allow sufficient time after closing for the transmission of loan data and the shipping of the loan documentation package.
Commitment Expiration Date
See Commitment Period (days) above.
Remittance Type
Select the desired remittance type from the drop-down list.
-
Actual/Actual: A method of sending mortgage payments that requires the seller to remit only the actual interest due (if it is collected from borrowers) and the actual principal payments that it collects from borrowers.
-
Scheduled/Scheduled: A method of sending mortgage payments that requires the seller to remit the scheduled interest due and the scheduled principal due whether or not payments are collected from borrowers. You must be approved for Scheduled/Scheduled remittance in order for this selection to be available.
Base Servicing Fee
The servicing fee is the portion of the borrowers' interest payments that the Servicer retains as compensation for servicing loans for Fannie Mae.
Typically lenders can retain anywhere from 25-50 bps for most products.
LPMI
The portion of the borrowers' interest payments used to cover lender-paid mortgage insurance, if applicable.
Total Servicing Fee
Fixed field. The sum of the Base Servicing Fee and LPMI.
Gross Margin
Field appears for adjustable-rate mortgages only. The amount that is added to an index value to create the mortgage interest rate for an ARM at adjustment.
Actual Net Margin
Fixed field. The Gross Margin minus the Total Servicing fee.
Min Pass-Through Rate
When you take down a mandatory commitment, you specify the minimum pass-through rate that may be delivered under that commitment. However, you may deliver mortgage loans with pass-through rates up to 50 bps above the minimum assuming pricing is available for the entire pass-through range.
If a commitment is taken towards the upper end of the pass-throughs that are being priced, 50 bps of pass-through rates above the minimum pass-through rate selected may not be available. In these instances, a commitment would only include the pass-through rates above the minimum that are currently being priced.
The minimum pass-through rate must be divisible by 1/8 (0.125%).
-
-
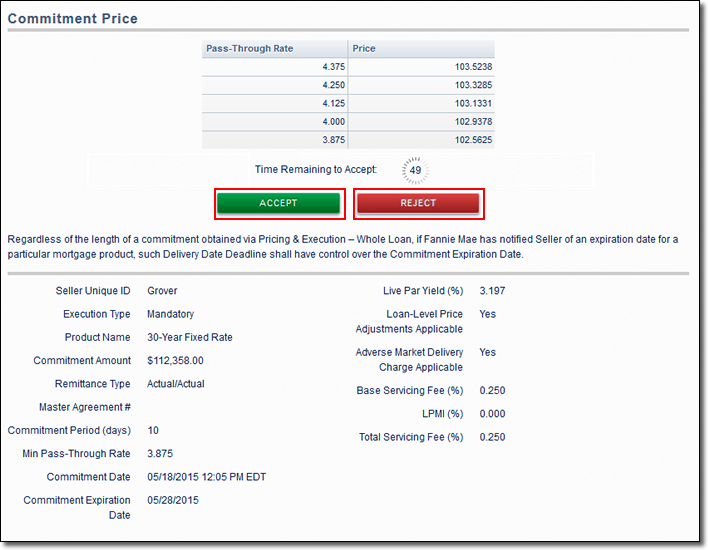
Click Get Pricing. The Commitment Price screen appears. It lists the commitment details and the range of pass-through rates that can be delivered under the commitment.
-
After reviewing the details, click Accept to finalize and accept the commitment.
Note: You have 60 seconds to accept the commitment, as all prices are "live" and may move throughout the day based on current market conditions. If the 60-second window expires or if you click Reject, you return to the Make Mandatory Commitment screen.
-
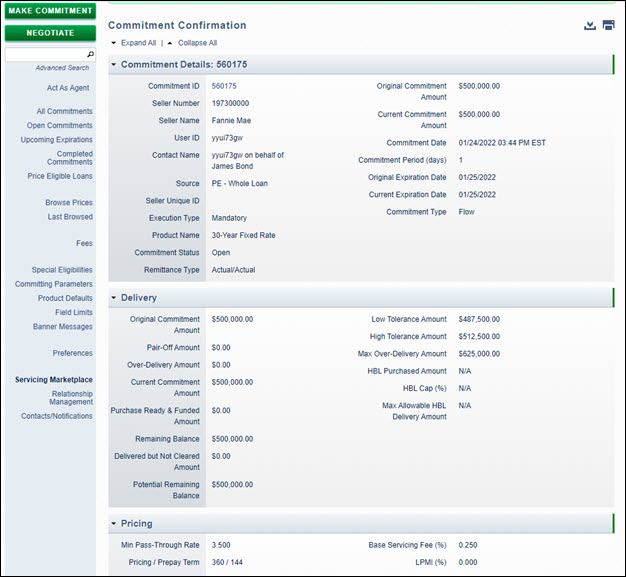
After the commitment has been accepted, the Commitment Confirmation screen appears with the information about the commitment. Review the information. Click the Expand All | Collapse All links at the top of the page to view/hide all information. Click on the arrow next to each section heading to expand or collapse individual sections.
The PE – Whole Loan application automatically generates an email confirmation of your transaction. An email confirmation will only be sent if an email address has been added to your contact information. For more information, see the Setting Up Your Contact Preferences job aid.
-
To export a Commitment Confirmation screen to a comma-delimited (.csv) file, click the Export icon
 at the upper right
of your screen. To print the Commitment Confirmation screen, click the Print icon
at the upper right
of your screen. To print the Commitment Confirmation screen, click the Print icon at the upper right of your screen.
 -
To make another mandatory commitment, click the Make Another Commitment button, which appears at the bottom of the screen.