My web
Admin Tool for Sponsoring Wholesale Lenders
![]()
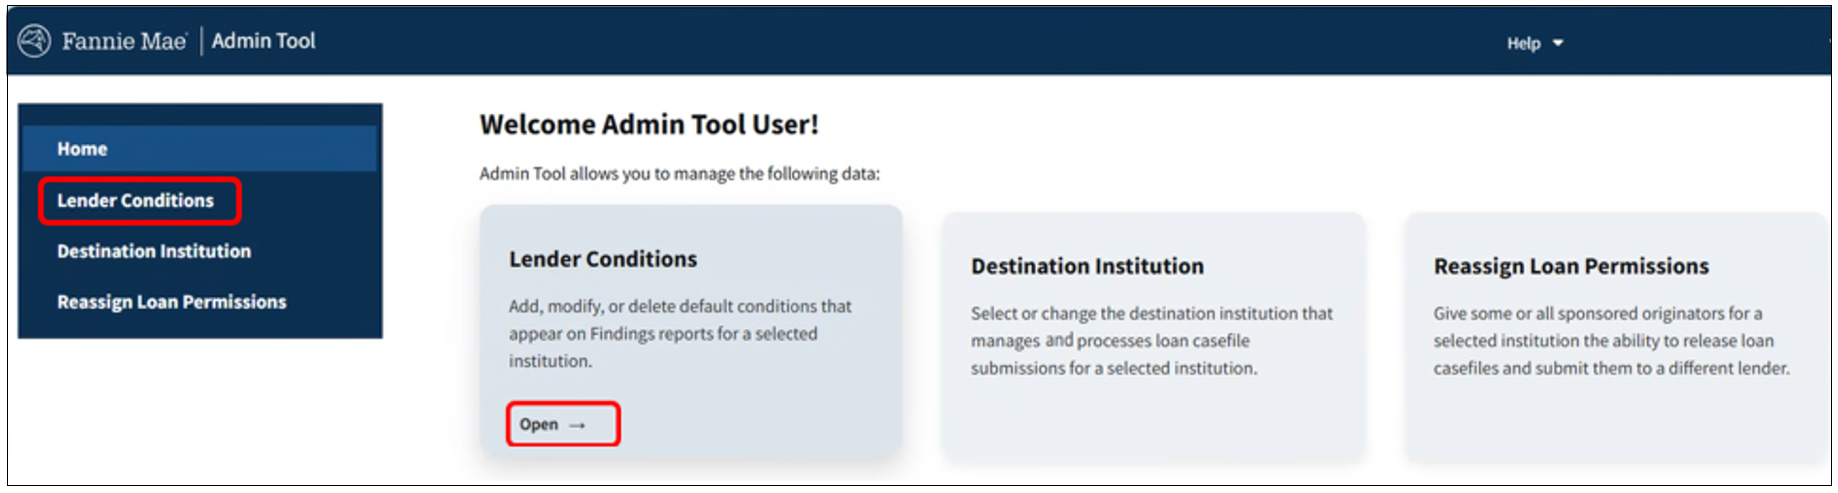
Admin Tool Overview
The Admin Tool allows you to manage your sponsored originators’ Desktop Originator® (DO®) submissions. For example, you can use the tool to give one or more of the originators you sponsor the Reassign Loan permission, which allows each selected originator to release their own loan casefiles and submit them to a different lender without having to contact you.
You may scroll through this document, or click a link to be taken to the information for the specified topic:
Managing the Destination Institution
Managing the Reassign Loan Feature
Granting Reassign Loan Permission to Selected Originators
Granting Reassign Loan Permission to all Institutions
Adding Lender Conditions to the Underwriting Findings
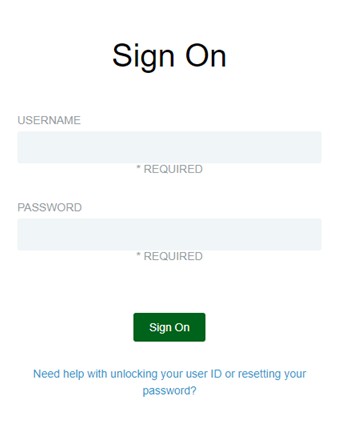
Accessing the Admin Tool
- Enter your username and password in the Admin Tool login screen and click Sign On.
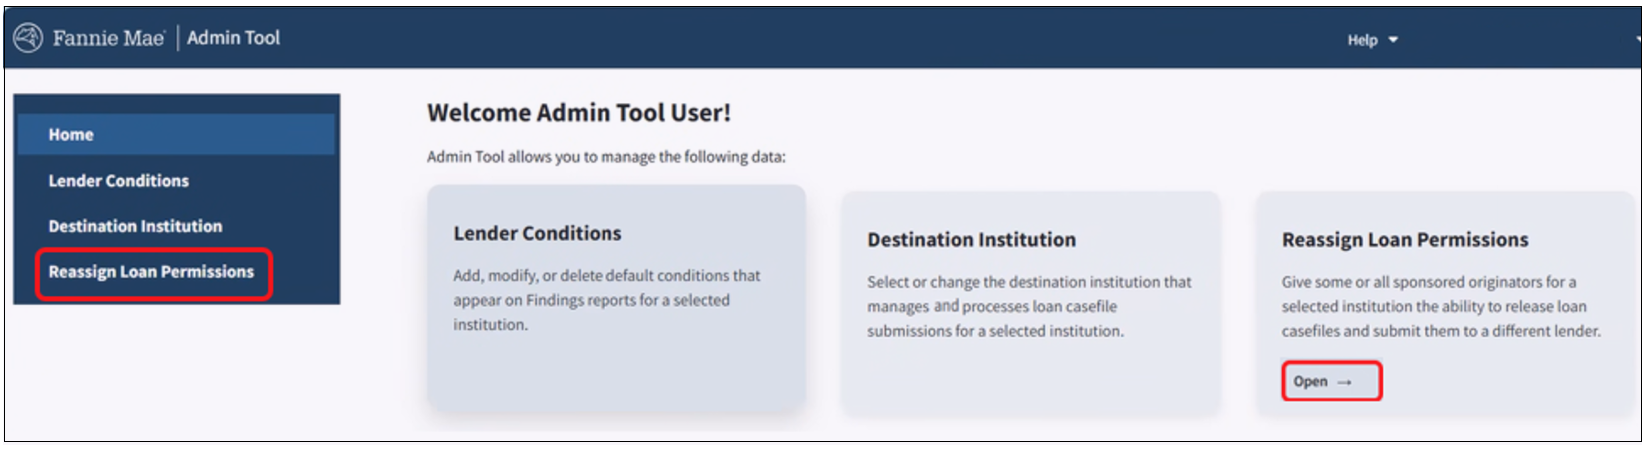
- The Home screen displays. The actions available actions appear in the cards and in the navigation bar.
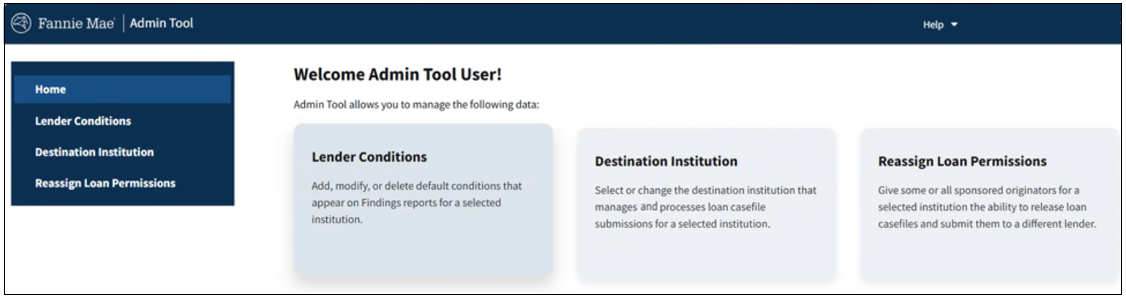
- Select the left navigation bar option or hover over the card to choose the function you want to perform and click the Open button.
Managing the Destination Institution
You can define the institution that will manage and process the loan casefile submissions for the selected institution. There are two ways to manage and process loan casefile submissions:
- You can use one institution to both submit and process loan casefiles. This is the default setting.
- You can submit loan casefiles to one institution and have them routed to a different institution for processing. This second institution is known as the destination institution. Only the destination institution can view or edit loan applications.
Note: When you change the destination institution, all loan casefiles that have already been submitted to the previous destination institution will only be available for viewing and editing by the previous institution. Resubmissions for these loan casefiles will also only be available to the previous institution.
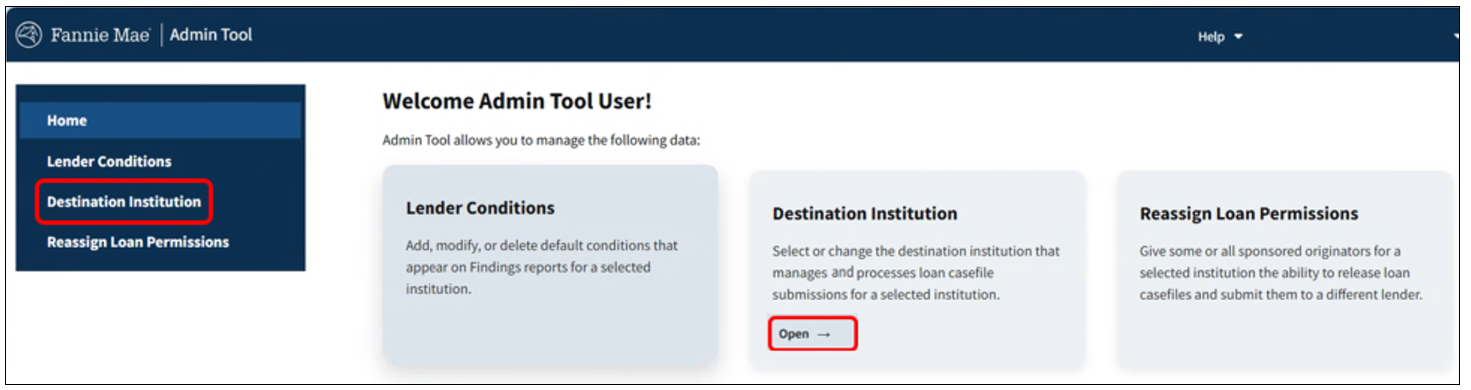
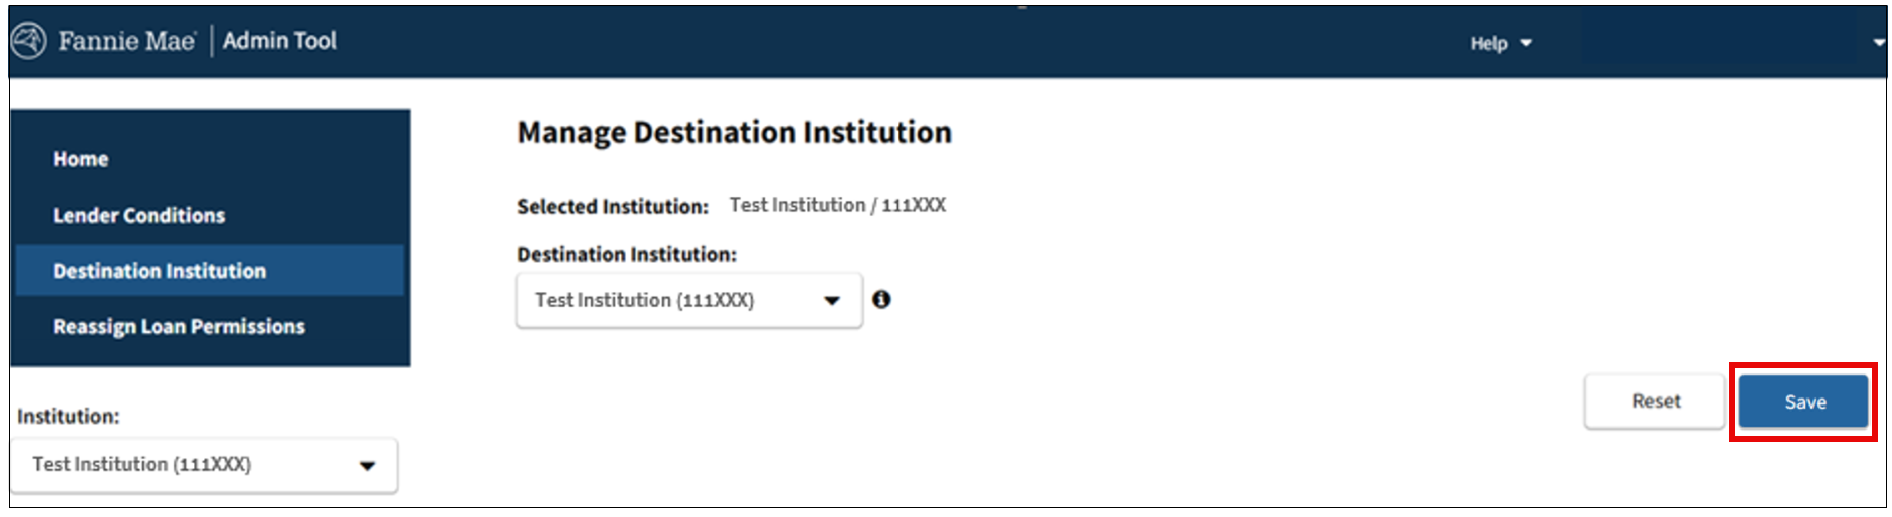
To manage the destination for loan casefile submissions from originators:
- SelectDestination Institution in the left navigation bar or click theOpen button on the Destination Institution card.
- Select the institution to manage using theInstitution drop-down.
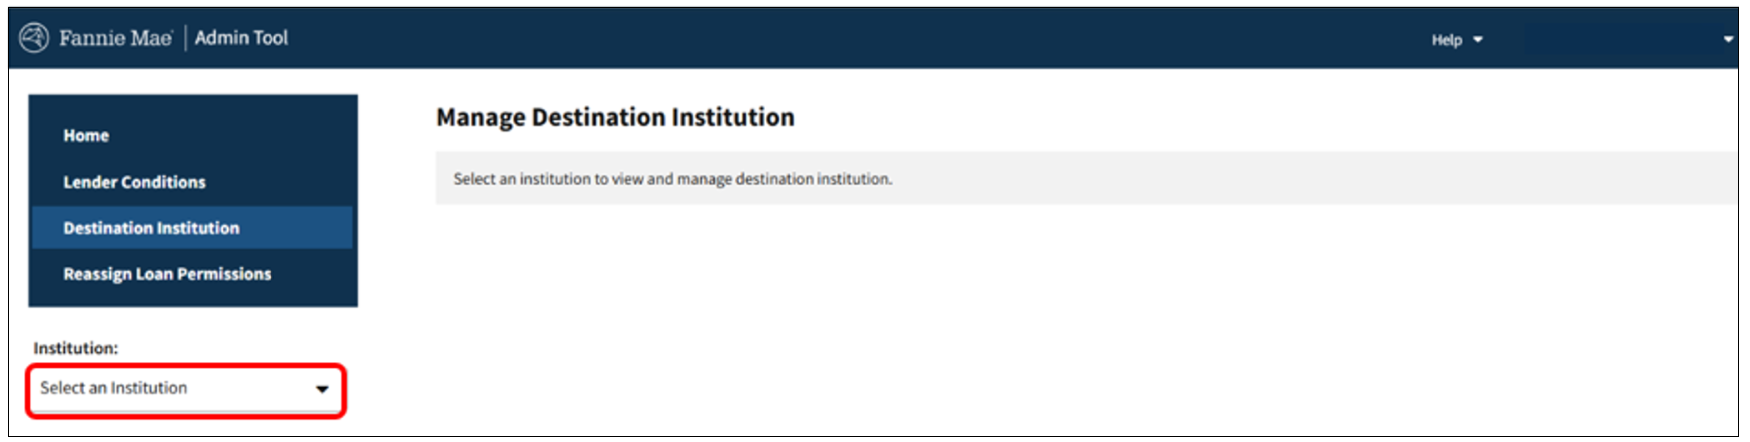
- Once you have selected an institution, the system displays the selected institution and the currently defined destination institution, if one has been defined.

- If no destination institution has been selected to date, the system indicates this by displaying the selected institution as the destination institution.
- To remove a previously selected destination institution and go back to having no destination institution, set the destination institution to the selected institution listed at the top of the screen and selectSave.
Managing the Reassign Loan Feature
You can grant selected originator institutions and their branches the right to automatically release a loan casefile from your institution without asking you to release the loan casefile for them. The originator can then submit the casefile to another lending institution.
You can select specific originator institutions and grant them the ability to reassign loan casefiles or you can grant permission to all your originator institutions at one time. Note that when you grant Reassign Loan permission, it applies to your originator institutions and all their branches. Refer to the Reassign Loan to Another Lender section in the Sponsored Wholesale Originator Features job aid.
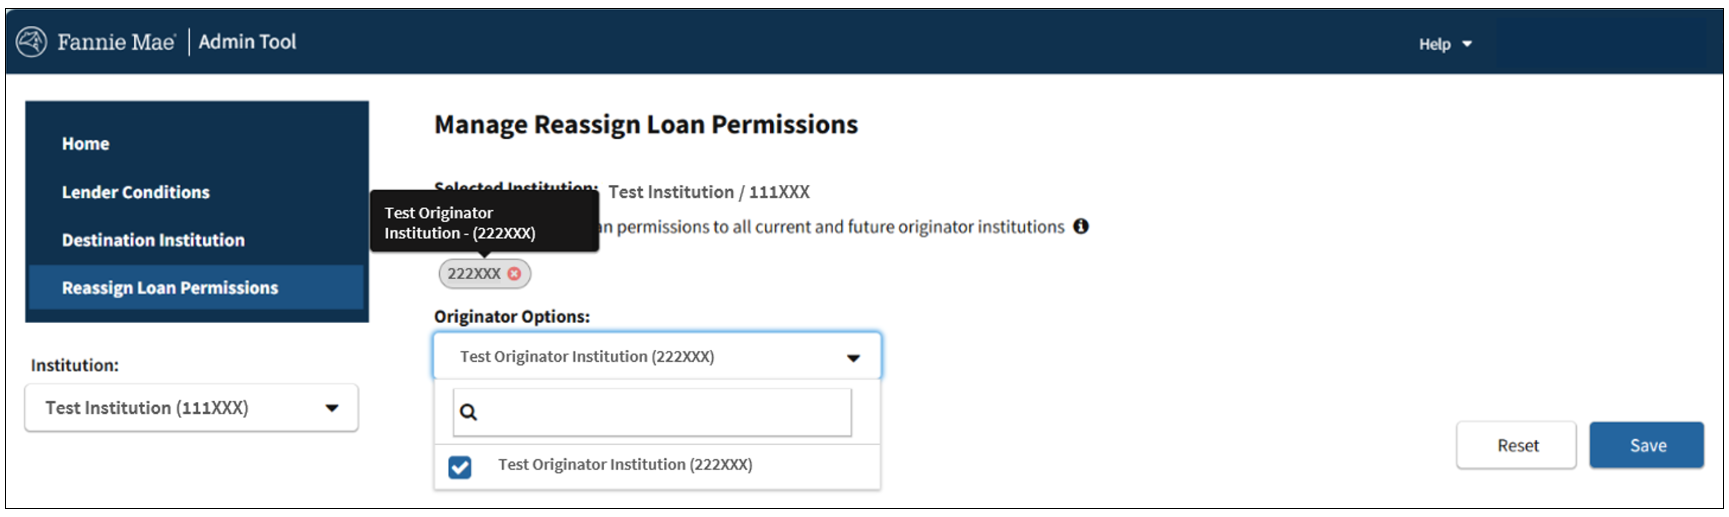
Granting Reassign Loan Permission to Selected Originators
To grant Reassign Loan permission to selected originators:
- SelectReassign Loan Permissions in the left navigation bar or click theOpen button on theReassign Loan Permissions card.
- Select the institution for which to manage Reassign Loan Permissions using the Institution drop-down.
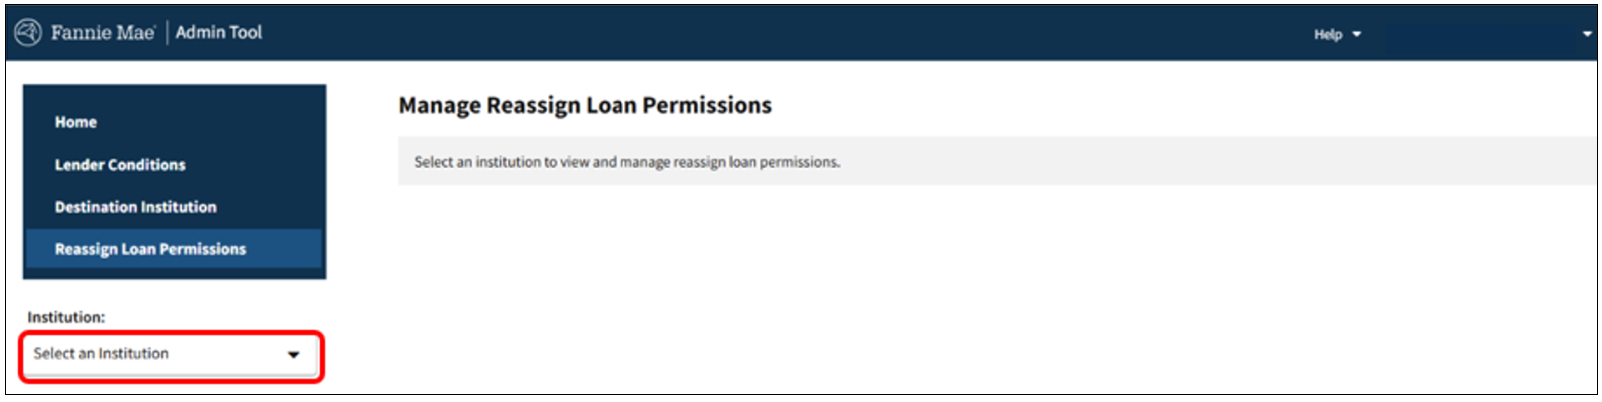
- Once you have selected an institution you will be able to manage the reassign loan permissions for your originator institutions. The information presented on this screen will depend on the current permissions. Follow the guidance below.
- If no institutions currently have the reassign loan permission, no institutions will be displayed. You can use theOriginator Options drop-down to select the originator institutions you would like to grant permissions for.
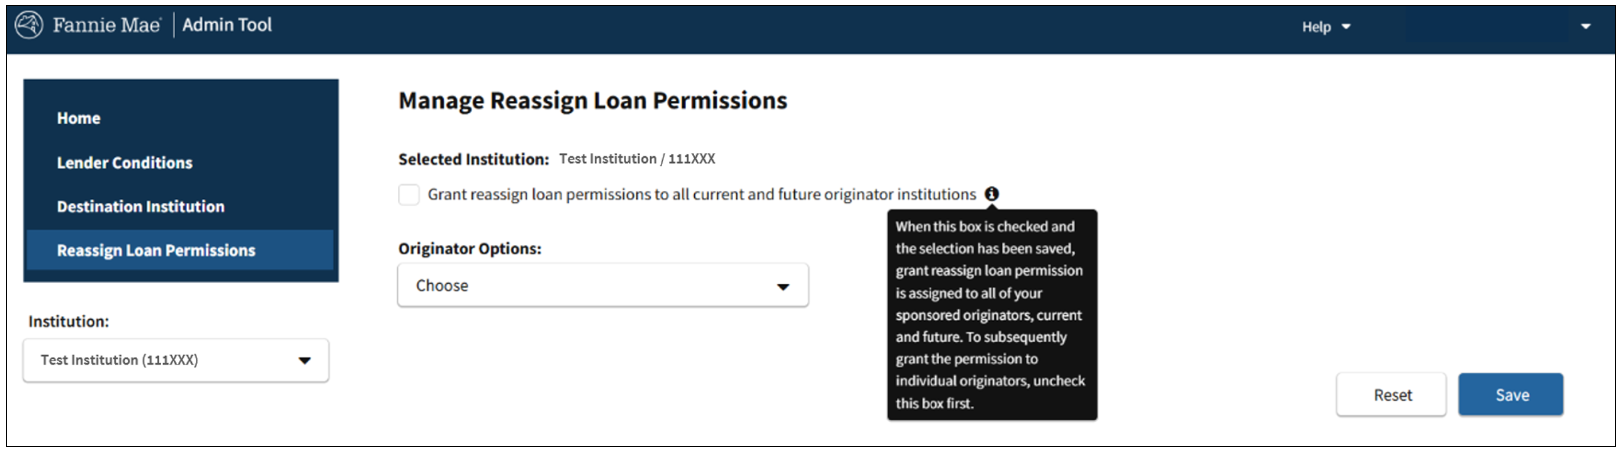
- If any originator institutions currently have the reassign loan permission, they will be displayed. You can manage the permissions in theOriginator Options drop-down by selecting or deselecting specific broker institutions to grant the reassign loan permission.
-
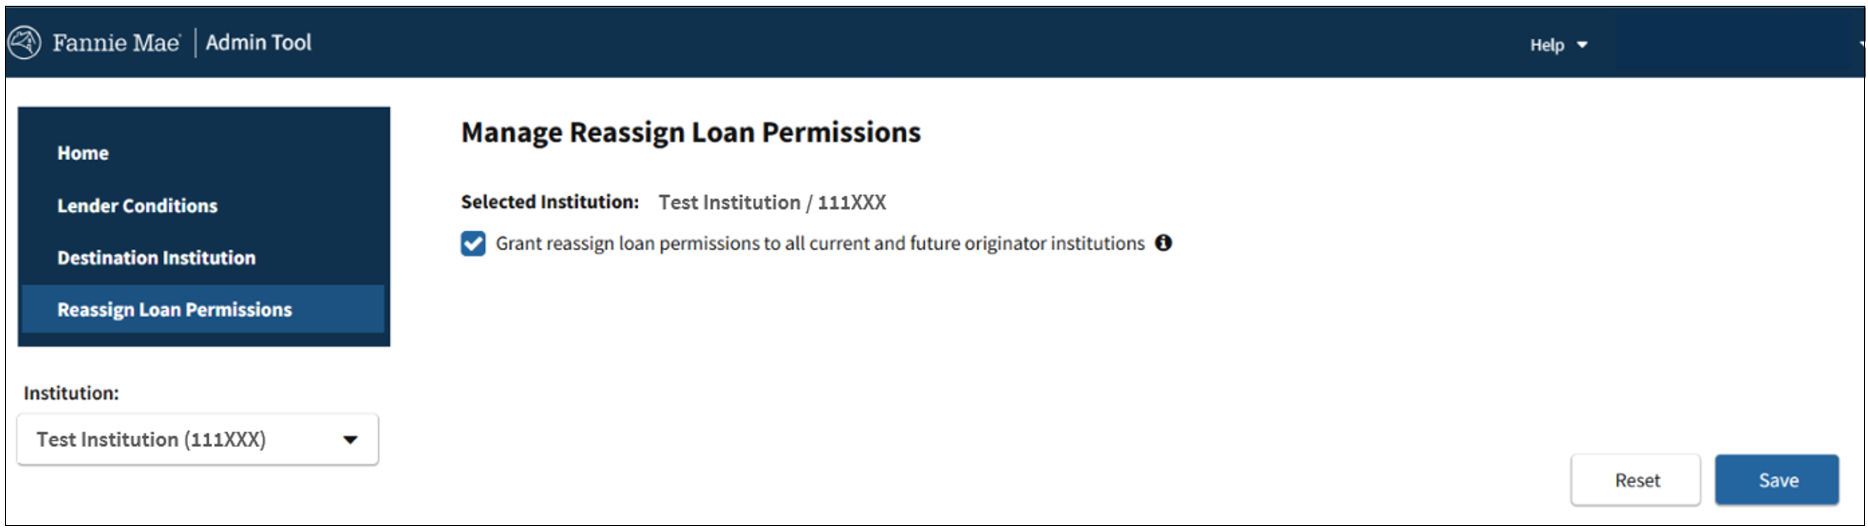
If reassign loan permissions has been granted to all of your originator institutions, the Grant reassign loan permissions to all current and future originator institutions checkbox will be selected. When selected, all originator institutions, current, and future, have the reassign loan permission. You can uncheck the Grant reassign loan permissions to all current and future originator institutions checkbox if you need to make adjustments to specific institutions.
- When all actions are completed, select Save.
Granting Reassign Loan Permission to all Institutions
- To grant permission to all of your sponsored originator institutions at one time, click on the Grant reassign loan permission to all originator institutions check box and select Save.
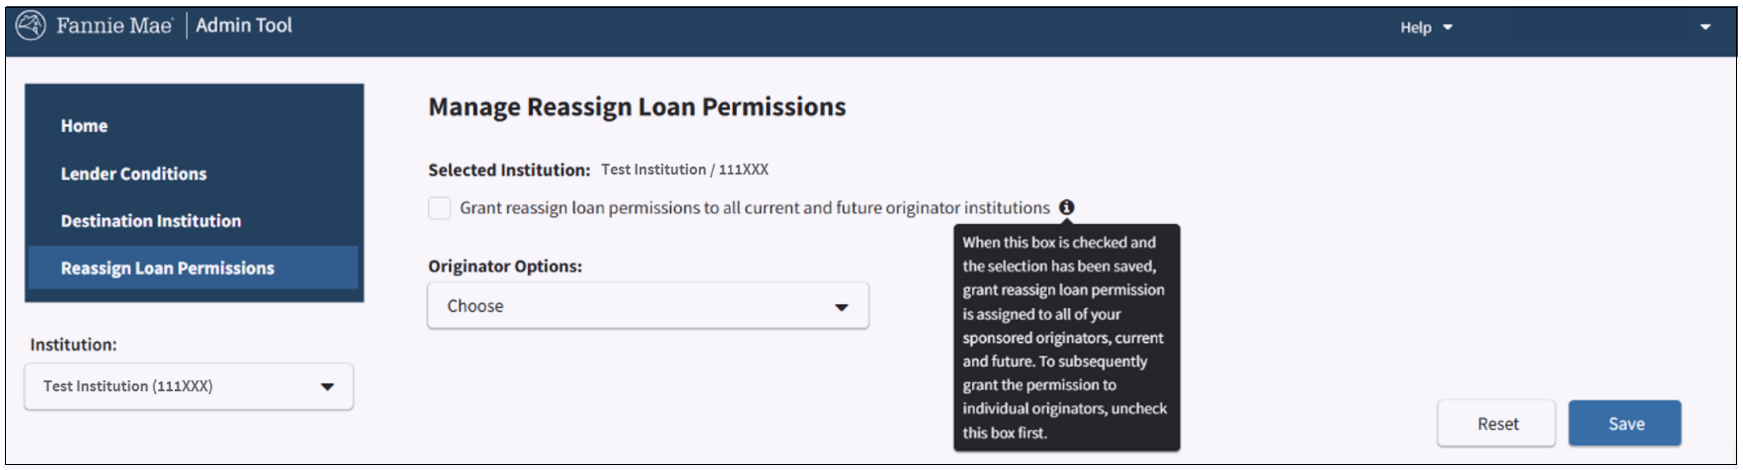
Note: You can also 'uncheck' the Grant reassign loan permissions to all current and future originator institutions checkbox and select Save if this was selected in error.
Adding Lender Conditions to Underwriting Findings
You can establish default conditions that will appear on all of the Findings reports that are created by your institution. For example, you might want to add the condition that you require a termite inspection for every loan. Using the Manage Lender Conditions function located in Admin Tool, you can add, delete, and/or change your lender conditions at any time.
Note: Changes to lender conditions will apply only to loan casefiles that are submitted after you make the change.
- Click Lender Conditions in the left navigation bar or click the Open button on the Lender Conditions card.
- Select the institution to manage Lender Conditions for using the Institution drop-down.
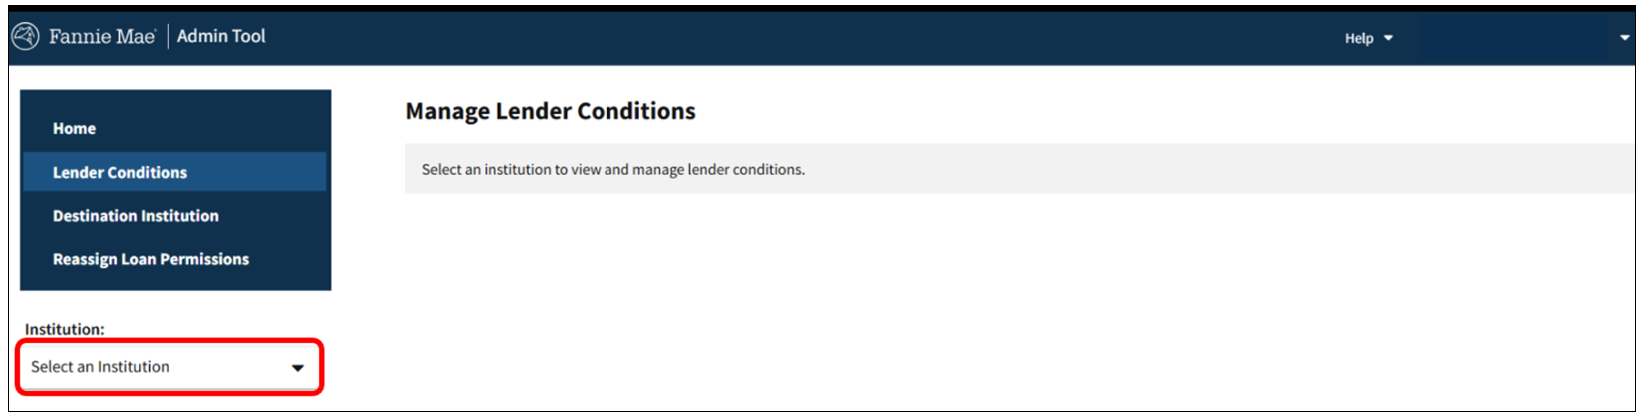
- The system will display the selected institution and any lender condition messages that have been defined to date.
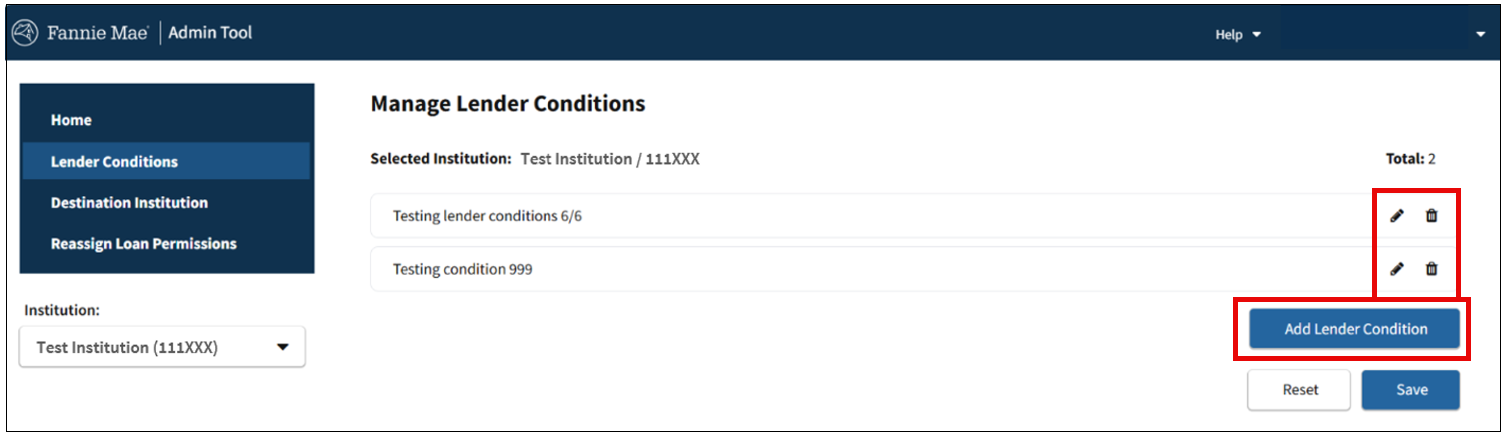
From this screen you can perform the following functions:
- Edit an existing Lender Condition using the edit icon.
- Remove an existing Lender Condition using the trash can icon.
- Create a new Lender Condition using the Add Lender Condition button.
- If no lender condition messages have been defined today, the system informs you that you can choose to add a lender condition message.
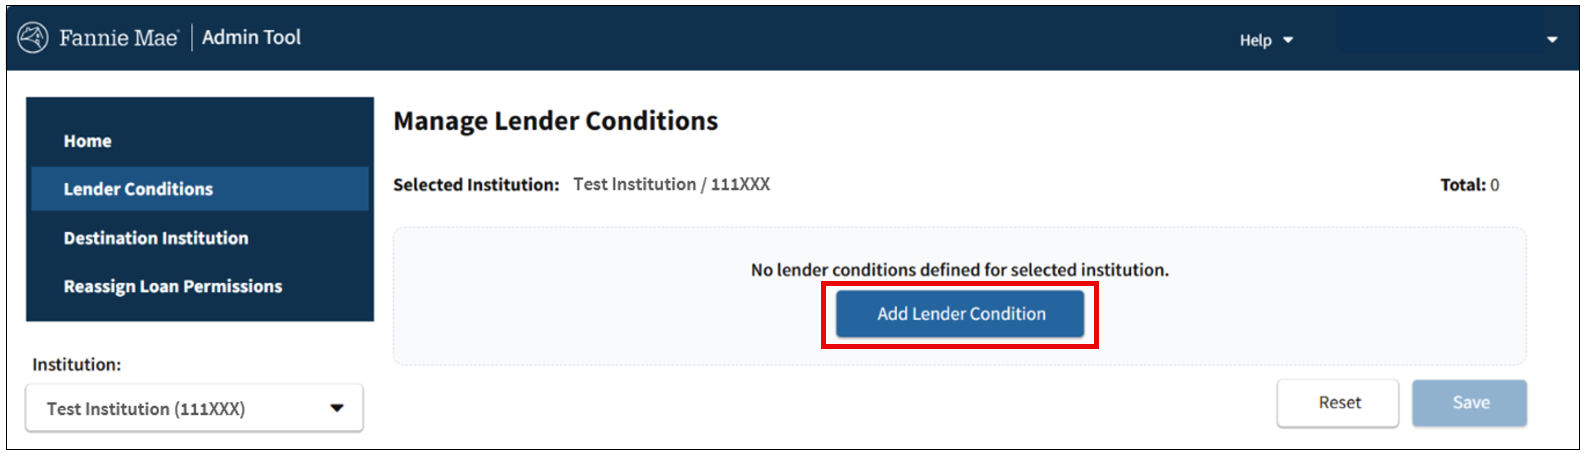
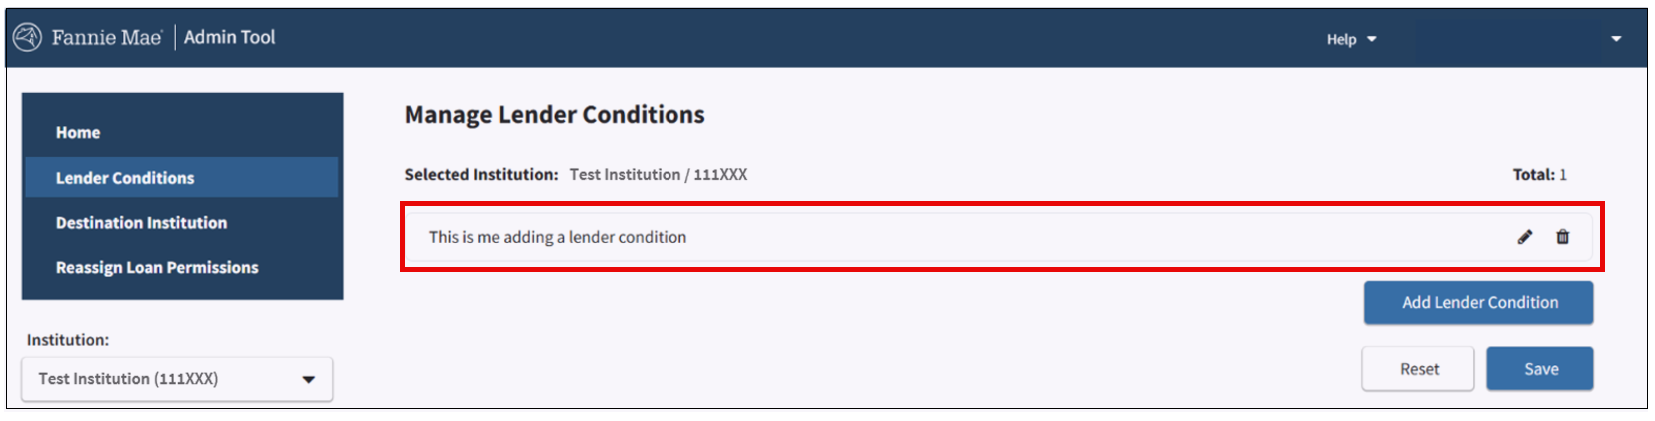
- To add a Lender Condition, select the Add Lender Condition button and an editable row will be displayed.
Notes:
The system allows a maximum of 25 Lender Conditions messages per institution.
The system does not allow special characters.
They system allows a maximum of 1500 characters.
- When all Lender Conditions have been added/edited/removed, select Save.
Common Functionality
The following functionality is common across all screens accessed within the Admin Tool:
- You can select the Reset button on any page. If the Reset button is selected, any changes made on the screen will be deleted and information will be reverted to the values as of the last time it was saved.
- You can also navigate to another function by selecting the options using the left navigation bar. If you select a different function and no changes have been made to the current screen, you will be taken to the function selected. If you select a different function and there have been changes made on the current screen, you will be prompted to either continue to the selected function or to stay on the current screen to save your changes.